Deploying an http4k app to AWS Lambda
In this guide, we'll run you through the steps required to get an http4k application deployed and running on AWS Lambda and available to call over the internet using AWS ApiGateway. If you're not familiar with the http4k concepts for HTTP and Serverless apps, then we advise you read them here and here. To make an app you can follow the Your first http4k app tutorial before tackling this guide.
We'll take an existing http4k application built with Gradle, add the bits that are important to Serverless HTTP apps then deploy it to AWS Lambda and API Gateway using Pulumi.
Pre-requisites:
- All the pre-requisites from the Your first http4k app tutorial.
- The AWS CLI installed and an AWS profile set up to use. See here.
- Pulumi CLI installed and configured for your system. See here.
- A working http4k application, built with Gradle. You can generate one from the http4k Toolbox if required. For this example, we're going to assume a simple "echo" HttpHandler which responds to
GET /echo/{message:.*}".
Step 1
We need to add the AWS Lambda Serverless module to our project. Install it into your build.gradle file with:
implementation("org.http4k:http4k-serverless-lambda:${http4kVersion}")
Step 2
The AWS Lambda runtime works by implementing an AWS supplied interface Request/StreamHandler and configuring that class to be loaded on an invocation on the lambda. The invocation requests themselves are transmitted as JSON which normally is unmarshalled by Jackson in the AWS runtime into the relevant AWS Event class.
http4k supplies pre-built StreamHandler adapters (they are faster) using the lightweight Moshi library to convert the invocations to standard http4k Request/Responses. We need to decide which version of the ApiGateway binding to use and then use the correct http4k class. For this example we're going to use ApiGateway HTTP Version 2, so we simply create a class HelloServerlessHttp4k extending the relevant http4k class and pass our app HttpHandler to it's constructor:
package guide.tutorials.serverless_http4k_with_aws_lambda

import org.http4k.core.Method.GET
import org.http4k.core.Response
import org.http4k.core.Status.Companion.OK
import org.http4k.routing.bind
import org.http4k.routing.path
import org.http4k.routing.routes
import org.http4k.serverless.ApiGatewayV2LambdaFunction

val http4kApp = routes(
    "/echo/{message:.*}" bind GET to {
        Response(OK).body(
            it.path("message") ?: "(nothing to echo, use /echo/<message>)"
        )
    },
    "/" bind GET to { Response(OK).body("ok") }
)

@Suppress("unused")
class HelloServerlessHttp4k : ApiGatewayV2LambdaFunction(http4kApp)
Step 3
To build the Lambda code into a ZIP file, we need to add a task to our build.gradle:
tasks.register("buildLambdaZip", Zip) {
    from compileKotlin
        from processResources
        into("lib") {
            from configurations.compileClasspath
        }
}
Run the new task with:
./gradlew buildLambdaZip
... and then take a note of the ZIP file that appears in build/distributions.
Step 4
The next step is to configure the AWS resources to send requests to our Lambda function. This is quite involved as far as setup is concerned, but for this we're using Pulumi as it provides a simple way to get started. The concept here is that you configure a "stack" in your chosen language (we're choosing TypeScript).
On the command line, generate a new Pulumi configuration by running:
pulumi new --name hello-http4k --force
... followed by selecting aws-typescript and then all the default options until Pulumi has completed.
Step 5
Pulumi creates a few files in the directory, but the most interesting one is index.ts, which is where we will configure our AWS resources for exposing the Lambda. Overwrite the content of index.ts with:
import * as pulumi from "@pulumi/pulumi";
import * as aws from "@pulumi/aws";
import {RolePolicyAttachment} from "@pulumi/aws/iam";

const defaultRole = new aws.iam.Role("hello-http4k-default-role", {
    assumeRolePolicy: `{
  "Version": "2012-10-17",
  "Statement": [
    {
      "Action": "sts:AssumeRole",
      "Principal": {
        "Service": "lambda.amazonaws.com"
      },
      "Effect": "Allow",
      "Sid": ""
    }
  ]
}
`
});

new RolePolicyAttachment("hello-http4k-default-role-policy",
    {
        role: defaultRole,
        policyArn: aws.iam.ManagedPolicies.AWSLambdaBasicExecutionRole
    });

const lambdaFunction = new aws.lambda.Function("hello-http4k", {
    code: new pulumi.asset.FileArchive("build/distributions/HelloWorld.zip"),
    handler: "guide.tutorials.serverless_http4k_with_aws_lambda.HelloServerlessHttp4k",
    role: defaultRole.arn,
    runtime: "java11",
    timeout: 15
});

const logGroupApi = new aws.cloudwatch.LogGroup("hello-http4k-api-route", {
    name: "hello-http4k",
});

const apiGatewayPermission = new aws.lambda.Permission("hello-http4k-gateway-permission", {
    action: "lambda:InvokeFunction",
    "function": lambdaFunction.name,
    principal: "apigateway.amazonaws.com"
});

const api = new aws.apigatewayv2.Api("hello-http4k-api", {
    protocolType: "HTTP"
});

const apiDefaultStage = new aws.apigatewayv2.Stage("default", {
    apiId: api.id,
    autoDeploy: true,
    name: "$default",
    accessLogSettings: {
        destinationArn: logGroupApi.arn,
        format: `{"requestId": "$context.requestId", "requestTime": "$context.requestTime", "httpMethod": "$context.httpMethod", "httpPath": "$context.path", "status": "$context.status", "integrationError": "$context.integrationErrorMessage"}`
    }
})

const lambdaIntegration = new aws.apigatewayv2.Integration("hello-http4k-api-lambda-integration", {
    apiId: api.id,
    integrationType: "AWS_PROXY",
    integrationUri: lambdaFunction.arn,
    payloadFormatVersion: "2.0"
});

let serverlessHttp4kApiRoute = "hello-http4k";
const apiDefaultRole = new aws.apigatewayv2.Route(serverlessHttp4kApiRoute + "-api-route", {
    apiId: api.id,
    routeKey: `$default`,
    target: pulumi.interpolate `integrations/${lambdaIntegration.id}`
});

export const publishedUrl = apiDefaultStage.invokeUrl;
The most important things to note in the above file are:
- (line 30) - the name of the input ZIP file - ensure this is correct from the last step.
- (line 70) - the
publishedUrl- this latter value in used by Pulumi to bind the URL of our Lambda to once it has been deployed and will be displayed upon deployment.
Step 6
Deploy your ZIP file to AWS with:
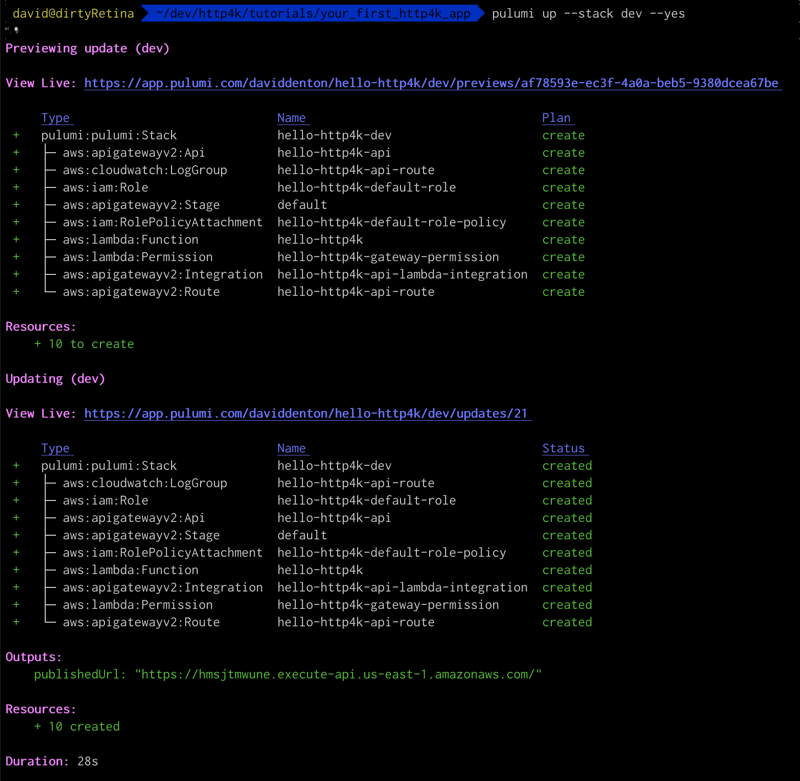
pulumi up --stack dev --yes
Pulumi will churn for a bit and all being well will display the URL at the end of the process.
Step 7
You can now call your deployed lambda by visiting: https://{publishedUrl}/echo/helloHttp4k. You should see helloHttp4k in the response body.
Step 8
To avoid any unwanted AWS charges, don't forget to delete all of the resources in your stack when you've finished by running:
pulumi destroy --stack dev --yes
Congratulations!
You have successfully deployed and invoked an http4k Lambda to AWS!
To see a complete example of a similar setup, you can check out the complete AWS Lambda app from the http4k Examples repo
(Ready for more? Let's move on to deploying a native http4k GraalVM Lambda to AWS)